The Chaos Vortex (chapter)
| The Chaos Vortex | ||||||||||||
| ||||||||||||
| ||||||||||||
The Chaos Vortex is the twenty-first chapter in the storyline of Kid Icarus: Uprising, as well as the final chapter in the Chaos Kin mini-arc. As its name suggests, this chapter directly follows on the events of the previous mission, with Pit heading into the deadly Chaos Vortex to retrieve Palutena’s soul from the Chaos Kin. Fitting for this chapter, it includes one of the most frantic and chaotic flight sequences in the game, as well as an arena-style land battle.
Aerial Mission
Pit’s mission begins directly outside of Palutena's Temple, although he quickly flies through the dimensional rift leading to the Chaos Vortex. Lead by Viridi once again, Pit is taken through this realm of pure chaos, filled to the brim with clones of various Underworld enemies created by the Chaos Kin. Before making it far, a wall of spooky-looking eyes suddenly appears and scares both Pit and Viridi, followed by a barrage of shadowy hands that attempt to block the angel’s path. The situation only gets more bizarre when the area goes completely dark and the colors of Pit become inverted. Upon making it out of this area, his color palette then becomes very dark until it is washed out when he flies through a flowing, midair Hot Spring. Shortly after, the Chaos Vortex introduces an exclusive enemy called Shadow Pit, which is essentially an evil clone of the angel armed with his various weapons.
Chaos Kin Miniboss
As Pit finally makes it deep enough into the vortex, Viridi quickly points out the Chaos Kin in the distance, beginning a fast-paced race to reach it before the Power of Flight runs out. Speeding past a deformed underground city, Pit chases the creature through multiple eye-shaped portals leading to areas that resemble locations from Wrath of the Reset Bomb and Magnus and the Dark Lord. During this time, Pit can shoot at the Chaos Kin while avoiding its own shots and clones that try to confuse him. Before long, the chase leads back into the main area of the Chaos Vortex, where everything is seemingly falling apart as the Chaos Kin grows desperate. The monster finally crashes into a floating rock, rendering it defenseless for a short amount of time. It must be shot at and defeated, or else it will quickly fly away and force Pit to restart the mission at the last checkpoint. If defeated, the Chaos Kin will fall to the large platform below, beginning the ground battle.
Attacks
- Crescent Blade: Fires a blue wave of energy from its tail.
- Lasers: Fires red lasers at Pit.
- Bomb: Tosses a bomb that homes in on Pit.
- Clones: Creates clones of itself to confuse Pit.
Ground Mission
The ground mission takes place on the single massive platform that the Chaos Kin falls onto, although the creature is nowhere to be found when Pit lands. Instead, it remains invisible and sends an entire army of its clones to battle Pit in separate waves. Being based on the angel’s memories, this army consists of Underworld, Forces of Nature, and Aurum troops that all collaborate in different ways unique to this level. This mission is made up of thirteen distinct waves that must be cleared before facing the Chaos Kin, which are as follows:
- The first wave mixes some basic Underworld and Aurum enemies, including Shulms, Corals, and Tribytes. They are later followed by a pair of Boogities and a large group of Monoeyes. A Treasure Box spawns at the end of this wave, but it actually doesn't contain anything.
- The second wave uses the aforementioned Treasure Box to lure Pit into the area where an extremely dangerous Orne appears. It's guarded by two Rezdas, some Monoliths, and multiple Handoras. Thankfully, the Orne doesn't move from its position and will explode when the other enemies have been cleared.
- The third wave spawns more Tribytes that will quickly disappear and reappear around the arena, making them difficult to hit. Miniature Cacaws also litter the area along with a valuable Treasure Fish that flies around the outer portion of the platform.
- The fourth wave includes two Belunkas that spawn Armins, as well as some Forces of Nature troops called Skreetles that crawl around the stage.
- The fifth wave tricks Pit by spawning an item-stealing Pluton along with multiple Shootflies, the latter of which will charge after the angel if he uses a ranged attack. Viridi will suggest using melee attacks to take out the Pluton, which is then be followed by two more.
- The sixth wave focuses on Nature troops, much to Viridi's chagrin. It includes a powerful Boom Stomper and some Bumpety Bombs accompanied by more Tribytes and a Sio.
- The seventh wave summons more Underworld troops, including a Shildeen and some Syrens. However, the primary danger here is a group of Aurum Quoils floating around the arena, which will disorient Pit if he comes into contact with them.
- The eighth wave includes multiple Zuree and another Orne. This one is far more dangerous because it will occasionally try to follow Pit around the arena. This wave also includes a group of Komaytos that must be taken out with melee attacks.
- As the ninth wave begins, Dark Pit suddenly flies onto the battlefield to assist in wiping out the remaining enemies. The dark angel explains how he and Pit are connected despite being separate beings, making it his priority to keep him alive. The ninth wave consists of a massive Crawler accompanied by an Urgle and one of its Aurum Clone counterparts. Once defeated, a second Crawler drops down to close off this wave.
- The tenth wave is made up of two dangerous Guttlers and some Skreetles to feed them. It's best to take out these hungry beasts first, so that they don't attempt to eat the other enemies to grow more powerful.
- The eleventh wave places multiple Igniots on the battlefield, some of which are guarded by Monoliths. Other Underworld troops litter the area to round out this wave.
- The twelfth wave brings in more Nature troops, the most notable being a pair of Megontas that are bouncing around on their backs. A dangerous Shelbo and some Trynamites close off this wave.
- The thirteenth and final wave summons multiple Skuttler Cannoneers riding Monoliths, which can be quite difficult to hit. A massive Snowman-spawning Dohz and some Bladers end this last wave, causing the Chaos Kin to finally reveal itself.
Boss Battle
The Chaos Kin is a fairly challenging boss fight, but not because of its strength. Instead, the creature’s small size and fast movements can make it a very difficult target to hit. Viridi helps to remedy this by spawning a weapon on the battlefield called an Electro Trap, which can pin down the Chaos Kin for a short amount of time. Otherwise, the monster itself doesn’t attack very often, but can easily disorient Pit by flying circles around him. Dark Pit also proves to be a valuable ally, as he often helps to distract the Chaos Kin to make it easier to hit. When it takes enough damage, the monster will finally explode and release Palutena’s soul.
Attacks
- Dash: The Chaos Kin charges at one of the angels.
- Eye Beams: The Chaos Kin fires lasers from its eye.
- Poison Cloud: The Chaos Kin releases a cloud of poison from its tail.
- Fireball: The Chaos Kin spits several fireballs.
Epilogue

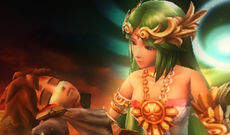
With her soul given back, Palutena’s body returns from its petrified state and she reawakens. However, the Chaos Kin once again revives itself as a snake-like cloud, but chooses to go after Dark Pit instead. It pulls him off the edge of the arena while Pit frantically gives chase. He begs Viridi to give him the Power of Flight, despite it being used up after the chapter’s aerial mission. She finally obliges, allowing Pit to speed down faster while his wings begin to burn. During this brief scene, Pit must be controlled and lined up with his dark counterpart to capture him and seal away the Chaos Kin once and for all. After doing so, Viridi extracts the two and returns them to Skyworld, where Pit is shown to be unconscious and his wings burned away, exposing the bone underneath. Palutena picks him up and looks to the heavens with sadness as she recalls Pit's wish to fly on his own, knowing that he could very well die from his wounds.
Trivia
- This is the only chapter where Pit encounters a Hot Spring during the mission’s air battle.
- Interestingly, friendly fire is applied in this chapter and Dark Pit's attacks will damage Pit and vice versa.
- During the eight wave, Pit breaks the fourth wall by saying that Komaytos look like little Metroids. Viridi then angrily says that the two games have nothing to do with each other.
